The form builder is the strength of Formularize. it has been designed to be a complete drag and drop interface, from adding new fields/headers/tabs(steps) to the form, to rearranging the fields. but first thing is first, to create a form you must first create a folder and give the groups you want to have permission to create forms the "add form" permission. Once you have created your folder, go to it on the front end, and you will be presented with a "Create Form" button in the folder. click on it.
Here you will be presented with the initial form creation, which is the forms basic configuration.
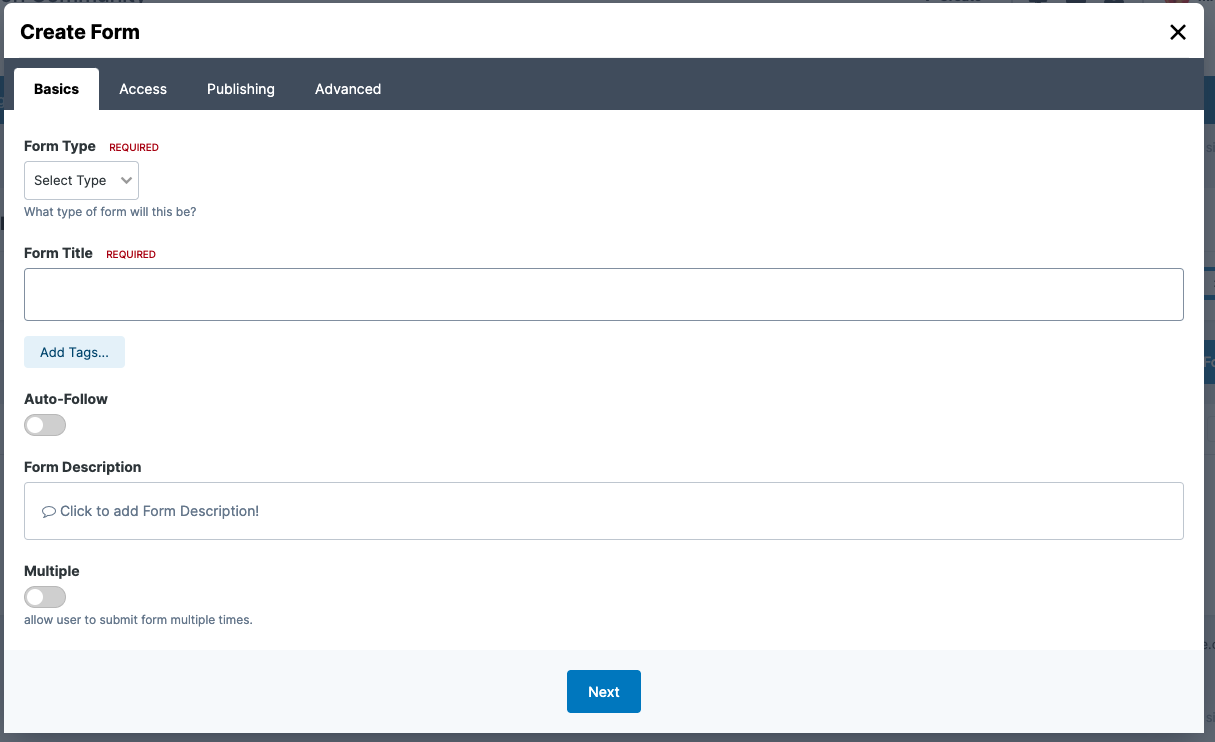
There are 4 form types you can select from, they all do different things in different ways.
Standard: this form type is just a plain old regular form.
Quiz: this form type opens up quiz features that are built into Formularize.
Wizard: wizard is a form type similar to standard, but you can create "steps" which you can add fields to it. what is special about this form type, when the form is taken, the steps act as "question groups" and only the questions associated with the steps will be shown. when the user clicks to go to the next step, it will show the next "question group".
Quiz wizard: quiz wizard works identically to a wizard, but it allows the use of quiz features.
Form options shared between all the form types:
Form Title: The name of the form, can be whatever you want.
Editors: editors are any number of other members you can add to this form, to give them the ability to edit/work on the form with you. As it might be a group effort and you want them
Tags: forms can be tagged.
Form Description: to describe what the form is for.
Auto Follow: this i for the form creator, to auto follow the form when it is created, to get notifications about new submissions.
Future Show: set a future date for the form to be shown to others.
Expires: set an expiration to how long the form allows submissions to be made.
Max Submissions: a maximum number of submissions to accept on the form before it auto-locks.
Multiple: you can set if a user is allowed to make multiple submissions to a form or just one.
Can Access: this is similar to editors, but instead of being able to edit the form settings and the fields, users in this list can only submit forms for testing.
Age Restrict: ask the user to confirm their age group before proceeding to take the form.
Standard and Wizard type form options:
Show Complete %: show percentage of questions that have answers.
Require Minimum Completion: enable a min percent of the form that needs to be filled in before it is accepted.
Min. Complete: the percentage of the form that you require to be completed to be accepted.
Quiz and Quiz Wizard type form options:
Show Correct Answer: show the correct answer to the user if they get it incorrect.
Show HighScore SideBar: Show high scores for this quiz.
Random Order: this will randomize the questions on a form, to have a less predictable order so answers can't be easily shared if the quiz is being used as some sort of test or contest. note: if tabs or steps are in use, the tabs/steps are randomize too, and the questions with in them will be randomized.
Quiz Timer: if you want this to be a timed quiz, you can set the time here. Note: if a quiz is started and then left, whatever time was used up while on it, the timer will pick back up from that time, it will not reset. this is to help prevent people from getting the questions and then the answers.
Require Score Threshold: if this enabled, you can define how many points a quiz must get to be considered "passing".
Score Threshold: the minimum amount of points to get to be considering passing.
Above Threshold Score Message: you can customize the message that is shown if they get a "passing" score. there are a few replacements you can use in the message that will be replaced to show like their score and amount of points available.
Below Threshold Score Message: you can customize the message that is shown if they do not get a passing score. there a few questions replacements you can use in the message that will be replaced to show like their score and amount of points available.
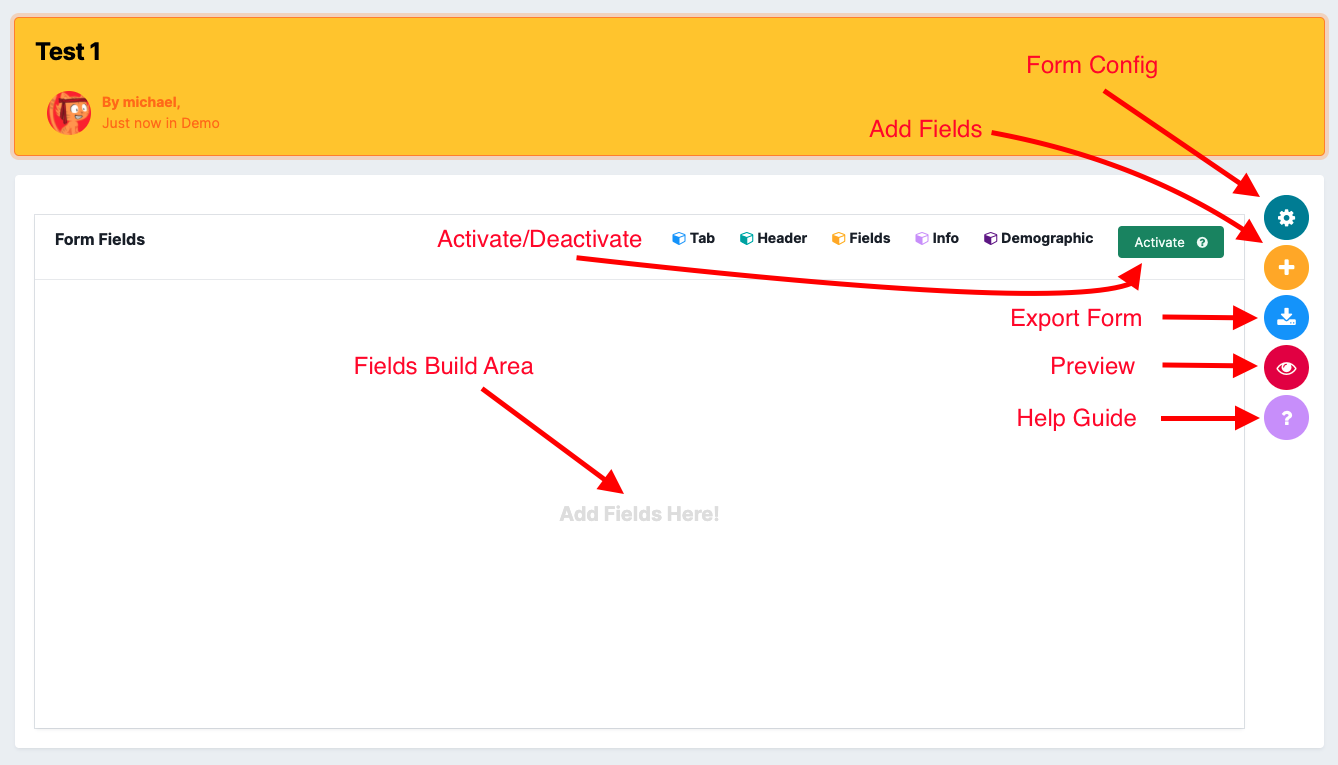
Once you have saved your form, you will be taken to the actual form builder. here you will have the option to preview the form (show what the form will look like for submissions), export the form (if your user group has the permission to export), form config (this is the form you are presented when you created the form, but on the form building it is hidden), and add fields menu, form activation/deactivation and the form fields build area.
Form Activation/Deactivation: if the field is deactivated, it will appear with a yellow header and the button will be green with the word "activate". If the form is deactivated, it will only show to the groups with editor/access permissions and the form creator. if it is activated, the button will appear red with the word "deactivate", the header will not be the yellow color and the form will be seen by everyone else.
To add fields, open up the add fields, you will be present with a list of field types, tabs(steps) and special field types.
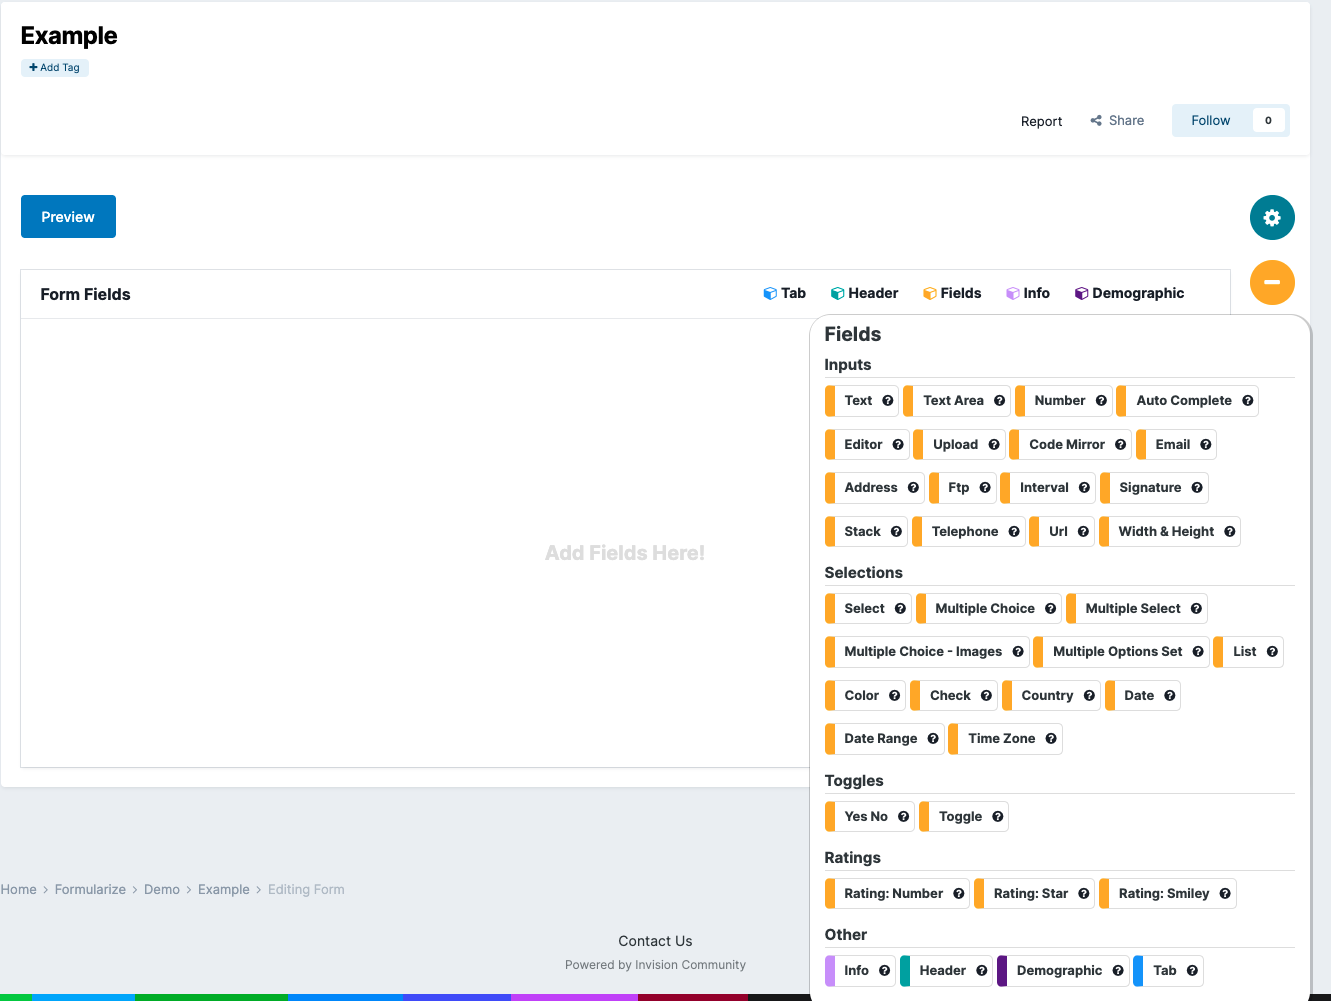
You can drag and drop any of the field types, tabs(steps), special field types into the field build area. you can also order them any way you like as you are dragging them from the add fields list to the fields build area (you can also reorder them after you have created them). Once you add a field, a dialogue window will open up give you access to the forms configuration (the only field you can not add multiple times would be the demographic field, if that field is enabled, it is also the only field you can not reorder, it will also place itself at the bottom of the list).
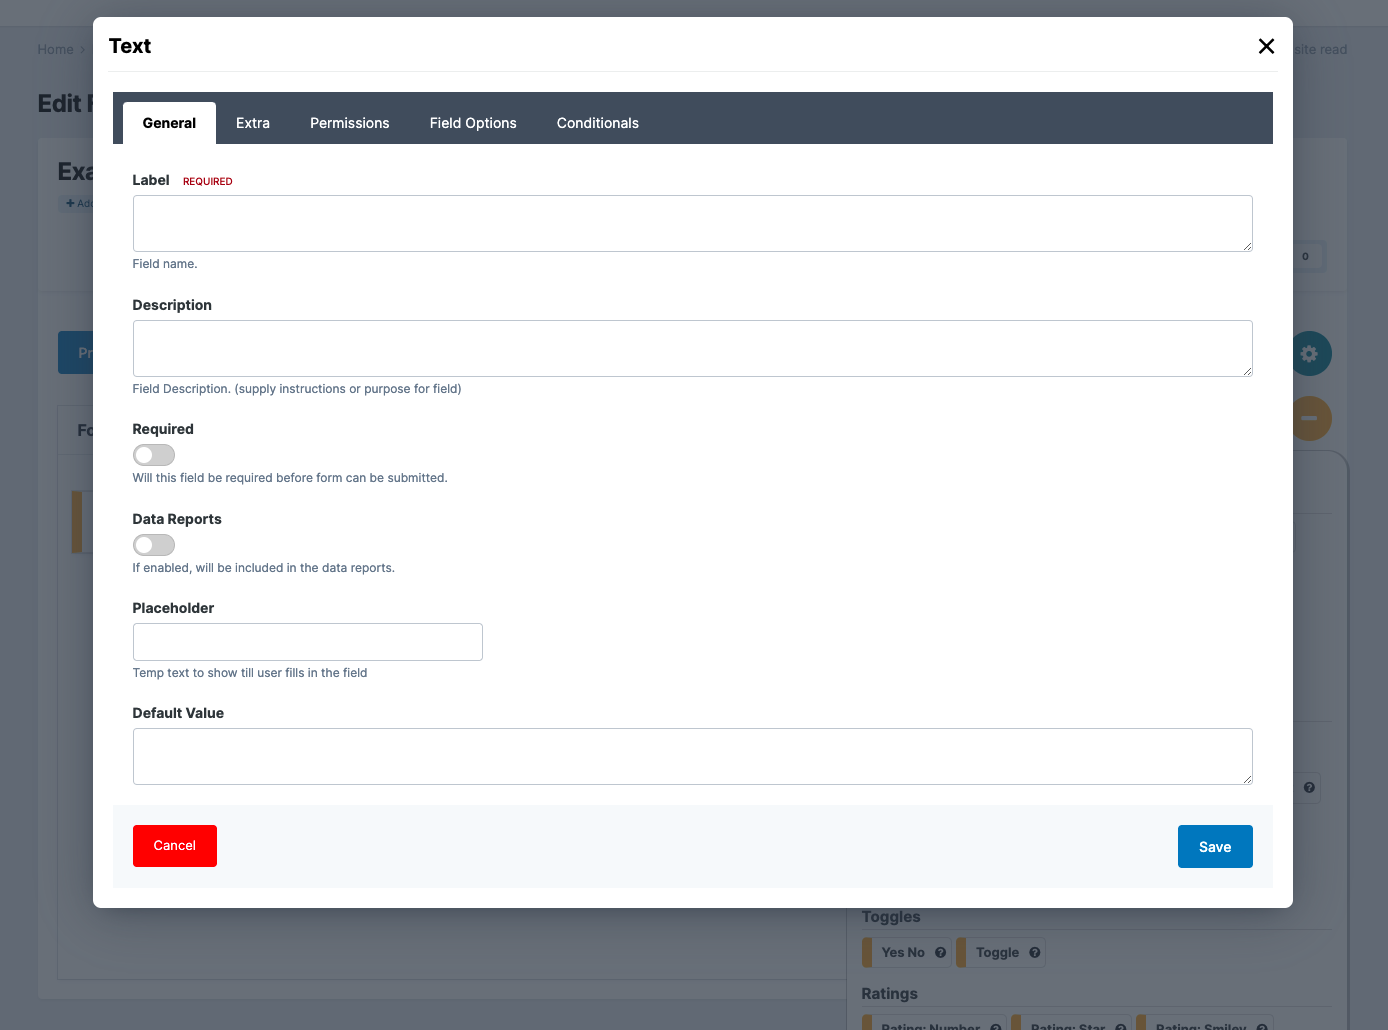
Each field type will have a various amounts of tabs or no tabs and options on those fields. These are a list of tabs that might show up on a field:
General: general configuration of the field, likes it name, description, if it is required or not (not all fields can be required), data reports (if this field shows up in the data reports), placeholder (not all fields will have this option), default value (this can be a input or a select list depending on the field type, not all fields will have a default options).
Extra: this is extra things you can add to a field, like extra css classes for styling, prefix (will show up at the front of a field), suffix (will show at the end of a field).
Permissions: Sensitive: set a field sensitive or not (this option will only show up if the field isn't an auto-sensitive field in settings, if it is, it will only show up if the users group has permissions to change it). Visibility: you can configure this field to only show to certain groups, this can be useful if you have a field that guest can fill out but you also want them to provide their email address or name. Note: if this field is used as a conditional to another field, those conditionals will be ignored if this field isn't visible to the users group.
Field Options: not all fields will have options, but the ones who do, you can find their specific settings here. on the fields that have this tab, it is most likely their fields will require these options to be configured.
Quiz: this tab will only show up on quiz or quiz wizard form types, here you can set how many points this question is worth and configured the right answer (if you need more flexibility to this, check out the guide for Right Answers).
Conditionals: this tab allows you to set the flow of the form, it allows you to select other fields from the form and a value for the it to determine if the field is shown or not shown (depending on the settings used here). some conditions will have just a value it must meet and if this field is shown or not, other conditions will have and operator option, that allows you to choose among a list of operators for the value and if this field is shown or not. you can have multiple conditionals for each field (note: not all field types can be used as a conditional, a fair amount of them can be tho). Note: conditionals are based on the order of the field order in the form build area. So if you set two conditionals, one to show, one to hide, and the criteria are both met, if the one to hide is ordered later in the field build area, this field will be hidden. You also might not want to go too crazy with conditionals, if you have to many, it might not have the desired effect.
In the Field build area, the fields are indented by the relationship to the previous field type. if you have tabs(steps) a tab will always be the first in the list (formularize will auto resort if you attempt to move a field to the beginning of the list or move a tab out of the first spot). Field types like Tab(steps) and headers are "grouping" type fields any regular field types under it are considered to be part of their group (the group ends at the end of the list or until there is another grouping field type, if a header is apart of a tab, and you select the tab to be moved, it will group the header to be apart of that tab. and if you move a tab, make sure you move the tab below another tab so that tab takes first position in the list.) To only move a grouping field type, hold down the ALT key when you grab hold of the move handle bar on the field item, this will disable the grouping and only move that field type.
Special notes about field types or the form build area:
Tabs and Steps are used in similar fashion in the form build area, they are both Super groupings so they will include any headers and regular fields below it, till the end of the list or the next step.
Tabs: for tabs to work correctly you must have at least 2, if you only have one, a tab will not be shown. due to the way the IPS form class works, a tab must be the first in the list, formularize will attempt to maintain this, so movie a tab from first in the list or a field to above the first tab, might reorganize the form in a undesired way.
Steps: step names can not be edited as they never appear on the form page or the submission page. they are really just a way to "group" the questions so when the form is taken, the group of questions will be shown. Steps can be deleted and moved, but you must have a minimum of two steps, formularize will not allow you to delete a step if you only have two.
Headers: headers are just simplistic "spacers" in between questions, to give them sort a sub section inside a tab/step or a split in the form if you don't want to. use tabs.
Most field types can be "cloned/copied" they will have all the same configuration as the parent they were copied from, but their name will be appended with a number.
Moving: all the field types can be rearranged, some of the fields have special restrictions like if you are using tabs or if the form type is wizard, a tab or step will always be the first in the list and the demographic field type will ALWAYS be positioned as last in the list, any field type moved after it, will automatically reorganize the demographic field type to the bottom of the list.
Editing: steps can not be edited, they can only be moved, copied, deleted.
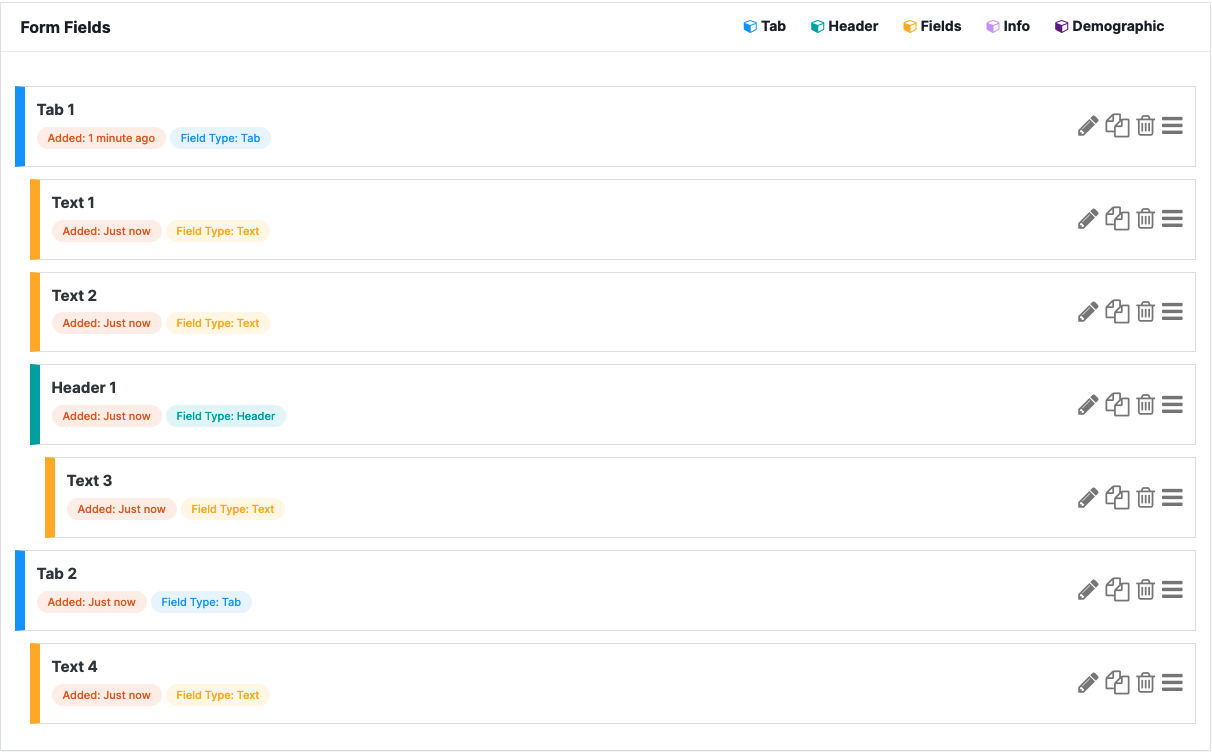
Badges: the badges on the field type will give you basic information about the field, its name, when it was added/last updated, what type of field it is, if it is sensitive or visibility is restricted and/or if it has an advanced field option in the ACP. there are extra badges that might appear that are field type dependent.
Left Border Color: the left border color denotes what type of field it is. by default any field with an orange left border is an input type field (one that a user can interact with). Blue is a tab, Red is a step, Teal is a header, light purple is an info field and dark purple is the demographic field type.
Grouping: Some field types like headers/Tabs/Steps are considered "grouping" type fields, where Tabs/steps are "super grouping" field types. If you grab ahold of a grouping type to move it, it will select any of the regular fields below to be move with it (until the next group field is reach, if a header is include in a tab/step, then the group will include it and go to the next tab/step, but a header will only group till the next header or tab/step). To disable this behavior hold down the ALT key on your keyboard before grabbing ahold of the drag handle on the field (the Bars at the end of the field).
Deleting: there are two ways to delete, you can click on the trash can icon or drag the field out of the field build area and drop it. both will prompt you to confirm the deletion. If you delete a field, it will also delete all its data from any submissions already made, so the submission data will not be retrievable if deleted.
If you have any questions or comments, leave them down below.

There are no comments to display.